
1 - Fix the colour balance using Levels
Before you begin, we need to check that your display is reasonably well setup - if it isn't, then there's no point in trying to fix colour issues because you'll only make things worse!
First step, check that your work area is relatively neutral in colour. If you're working against a red wall for example, then you're likely to have problems with red/blue balance in your images. Also make sure that your desktop configuration is fairly neutral - the default XP colour scheme tends to use a lot of blues and greens - you might find it easier to use something more neutral. I'd suggest going into ControlPanel/Display, Appearance tab, and setting the Color Scheme to Silver.
Next, if you haven't calibrated your monitor, we need to check whether you can see at least the major greyscales - most computers can display 256 shades of grey from black to white. If you can't see all 16 in this chart, you definitely need to make some adjustments!

If all the dark tones have merged together - increase the brightness. All the light tones have merged - reduce the brightness. If you can only tell a difference between the mid tones, then you need to reduce the contrast. If you still can't get all tones to display correctly, you'll probably need to find the display gamma settings. Under Windows XP, go to the Display Control Panel, Settings tab, Advanced button. Where the Gamma settings are depends on which graphics driver you're using - but usually you'll find a tab for your graphics card - under that you'll find an option called Color Correction, and there will be a Gamma Adjustment there. Refer to your graphics card manual, or computer supplier if you can't find it.
Back to the tutorial! If you look at the original image you'll notice it's rather blue, but it shouldn't be. How do we fix this?
The best way to fix a colour cast is to use a Photoshop command called Levels.
To find the Levels command go to the Layer menu, select NewAdjustmentLayer, and then Levels. We should now have a box like this on screen:
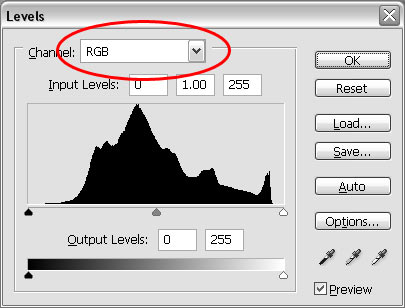
We could also use Levels from the Image menu, which will give the same result - but this way we can save the layers so we can adjust/remove them later!
Right, so as you can see there's a black mountain in the middle if the Levels window - this represents the colours in this image. On the very left of the mountain (at the black triangle) we have true black, on the far right of the mountain (at the white triangle) we have pure white. In a normal image the mountain should just touch the far edges by the black and white markers. Unfortunately in our image it doesn't. So we need to fix that!
In this particular image you may remember there's a noticeable blue tint? Unfortunately that means that simply adjusting the black/white markers isn't going to help, so we're going to need to change the colours. So, how do we do that?
See where I've highlighted the bit saying RGB above? Click it and you should see four options: RGB, Red, Green and Blue. We're going to change each of the three primary colours in turn. Start by selecting Red (Shortcut: Ctrl 1). You should now see a very similar box, but at the top next to Channel it says Red - like this:
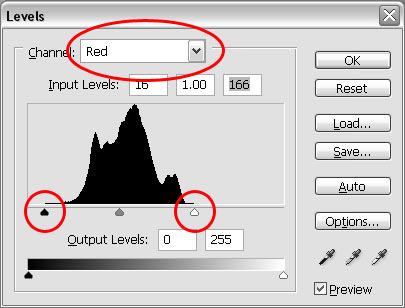
See how the mountain is not even close to the edges? We need to correct that - to do so you need to move the black triangle (by click/dragging) to the right until it just touches the most left hand tail of the mountain, and release it.
Now move the white triangle on the right slowly to the left (by click/dragging) until it just touches the right hand edge of the mountain - as shown above.
Why? Because it'll cause the Reds in the image to spread all the way across their brightness range. How does that help? Well it fixes one of the three colour channels - Red. That means we still need to fix the other two. So, once you're happy that you've moved the markers correctly it's time to move on to the next channel.
See where I've highlighted the bit saying Red above? Click it again and you should see the same four options: RGB, Red, Green and Blue. Since we're changing each of the three primary colours in turn, we need to select the next colour Green (Shortcut: Ctrl 2). You should now see a very similar box, but at the top next to Channel it says Green - like this:
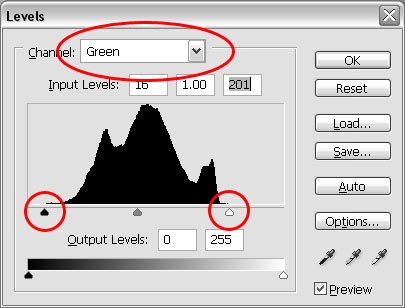
See how the mountain is not even close to the edges again? We need to improve that too - so use the same technique as before. If you remember, you need to move the black triangle (by click/dragging) to the right until it just touches the most left hand tail of the mountain, and release it. Now move the white triangle on the right slowly to the left (by click/dragging) until it just touches the right hand edge of the mountain - as shown above. That's the Greens fixed.
So now we're ready to fix the final colour channel Blue! Can you guess how? Yes, just use the same process of clicking on the Channels to select Blue (shortcut: Ctrl 3), and repeat the process of moving the markers until they touch the edges of the mountain - like so:
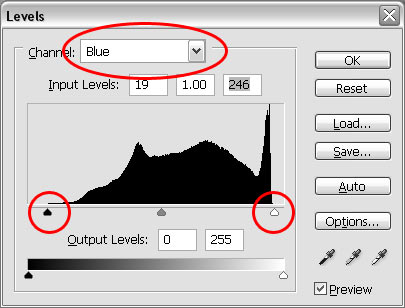
That's all the colours corrected - but for a final touch, let's brighten up the midtones to enhance the effect of the pale bear in the snow. How? Well, go back to the channels dropdown and select RGB again.
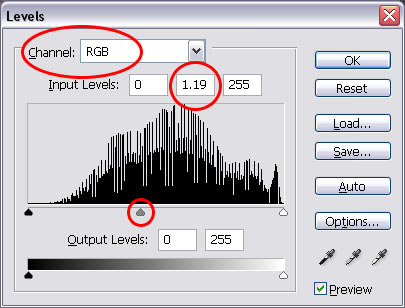
All we need to do is move the midpoint slider (in other words centre triangle) to the left. That has the effect of brightening the midtones, if you slide it the other way you'll darken them instead.
Right, that's it - if you press OK to accept the changes you should find the image now looks much more realistic! Remember that you can use this technique to fix the colours on any image which should have true blacks and bright whites in it :)
The coolest part about using an Adjustment Layer to adjust the Levels is that we can turn the effect on and off at will. Below is a shot of the Layers palette - see the eye icon circled in red? If you click on it you can turn the Layer effect off - don't forget to click again to turn it back on though!
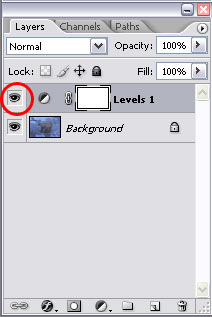
Note: If you can't see the Layers palette, it could be turned off - you can press the F7 key, or go to the Window menu and select Layers to turn it on.
Oh and in case you're wondering why the buttons on my screenshots say Reset and not Cancel - that's because to capture just the window I had the Alt key pressed down. In Photoshop pressing the Alt key often causes alternative options to appear, in this particular case it replaces Cancel with Reset! Feel free to experiment with it if you're curious.
Next: Page 2: To align the image using the MeasureTool and Rotate