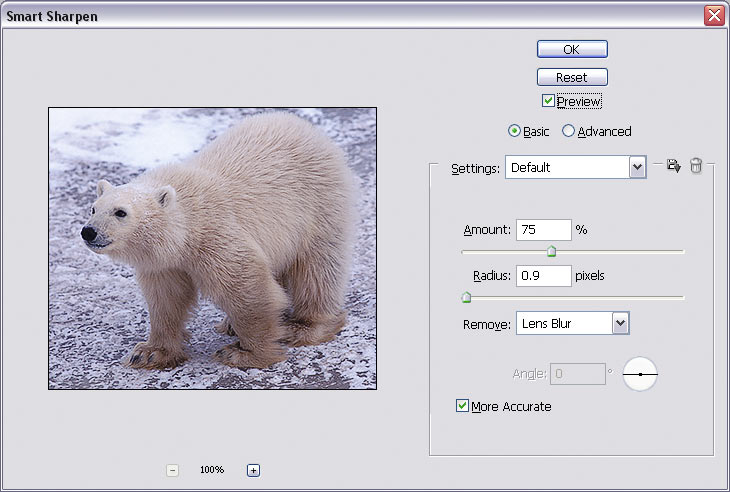
3 - Bring out detail using SmartSharpen
If you're happy with the Levels and Curves steps you've applied to image, you can set them into the image by selecting the Layer menu and then Flatten Image. This will mean you can't adjust the settings any more - but it will save you getting confused by which layer you're working on, more importantly it allows you to see the results of your sharpening on the finished image.
So, why do we need to sharpen? Resizing images will result in a loss of apparent detail, as does scanning, and sometimes the process of digital capture itself - the good news is, it's very easy to correct a minor loss of sharpness in Photoshop.
That's the good news, what about the bad? Well, unfortunately there's no magic formula to apply to all images, so finding the optimal settings involve a bit of trial and error... Also different people have different preferences, what to some is unacceptably soft is oversharpened to others!
So, how do we actually sharpen an image? The simplest option in Photoshop is Filter/Sharpen/Sharpen - unfortunately that offers no fine tuning, unless you count using Edit/Fade afterwards. So, what else is there? Fortunately there are two better options Filter/Sharpen/UnsharpMask, but better still is Filter/Sharpen/SmartSharpen (although it's only available in CS2).
Since this is a smallish image, and it's intended for web use sharpening is quite straightforward - we'll use a single step SmartSharpen. Select the Filter menu, and find Sharpen, then select SmartSharpen like so:

So, what do all those settings do?
Amount: Describes how much sharpening we're going to apply - 0% is none, 500% is almost always too much ;) 75% is often a good starting point.
Radius: Determines the size of the detail that will be sharpened. Fine detail is best sharpened with a value of around 0.9 pixels. The coarser the detail to be sharpened, the larger the radius value.
An oversharpened image will show haloes - brighter and darker bands around sharp edges. So, what does a halo look like? On the left we have a reasonably sharpened image, zoomed to 300% - whilst on the right we have an oversharpened image showing haloes. Look at the border between the dark blue and the pale, see that band of paler blue? That's an oversharpening halo:

Remember: Always sharpen at 100% magnification (that's the 100% bit underneath the small image in the sharpen window), that way you can see the effect properly - and then zoom in to check for haloes. If haloes start appearing around edges then you've oversharpened, reduce the Amount value until the haloes disappear.
Another technique that's useful for sharpening is the high pass technique, see this article for more info: > High Pass Sharpening @ luminous-landscape.comNext: Page 4: Save the image using SaveForWeb