
Previous topic: Shooting for HDR
Before we start, a word about computer viruses. Whilst all of the products below were virus free when I downloaded them, you should *always* virus check any software before you install it. Mistakes can happen, and websites can be hacked. I suggest you always approach new websites with caution.
This section assumes that you'll be using Photomatix as your HDR merging and processing package; the free trial version will be fine for the purposes of this tutorial, but it will add a watermark to your finished results.
I think Photomatix is good, but it's not the only option out there. Before you buy anything I suggest you experiment with other packages, there are plenty to choose from out there! A good list of alternatives can be found here @ panotools.org. Many of the concepts in this section apply to other software, but obviously the specific buttons and menus will be different.
First step, if you don't already have it, you'll need to download and install Photomatix. I suggest you start off with the free trial version, and if you find you like it and want to explore further, you can register it. This tutorial assumes you're using Photomatix Pro 3.02 for Windows (current as of 21Apr08), although the process for the Mac version is very similar.
Next download my Sample images. You'll need some form of zip utility to open that; you can test whether you have one installed by double clicking on the file. If you can't open it, then you'll need to download something that can open zip files. I use 7zip; it's free and works well on my system.
Once you have Photomatix installed, and the samples downloaded and unzipped, we're ready to begin!
Now start up Photomatix, if you haven't done so already.
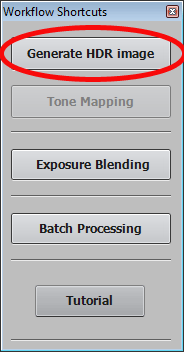
At this point you should see a grey window, entitled Photomatix Pro 3.0. On the left hand side of the screen there should be a palette labelled Workflow Shortcuts; this feature is new to v3, and it provides shortcuts to the most commonly used options. If you can't see that window on your Photomatix screen, go to the View menu, and select "Show Workflow Shortcuts". If you can't find either, you're probably running an older version of Photomatix.
To create an HDR image from your set of photographs, click on the "Generate HDR image" button from the "Workflow Shortcuts" palette, which I've highlighted in red below.

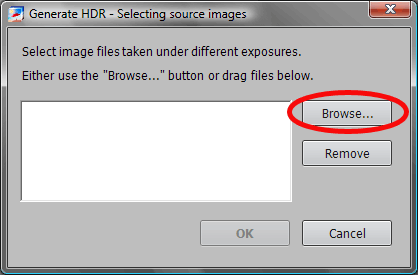
When you click on that you'll get another palette called "Generate HDR - Selecting source images", this is where we select the images we wish to merge into an HDR. Click the "Browse" button, highlighted in the following image.
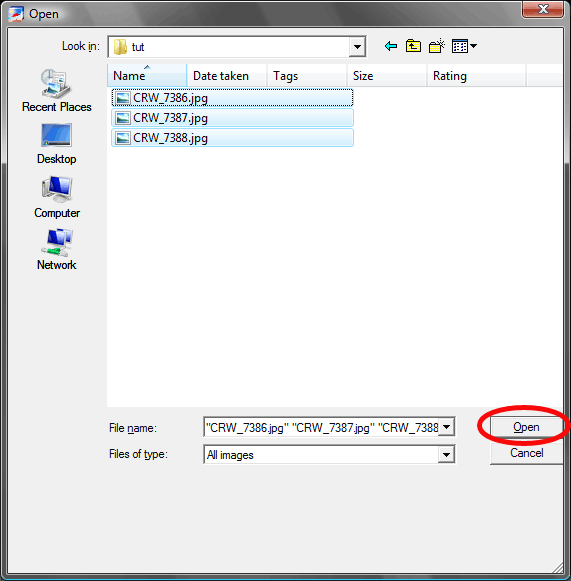
You will now be in the "Open" file requester. Navigate to the location of the images you wish to make into an HDR, and select all the files you need to use. Remember that you can select multiple images by holding down the Ctrl key. Once you've done that click the "Open" button as shown below.
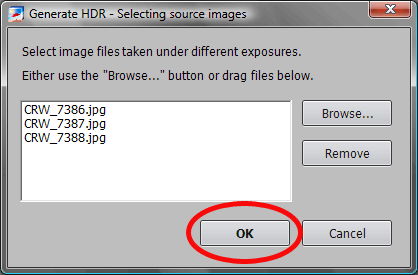
Now that you've selected all the source images, they should appear in the "Generate HDR - Selecting source images" window, if they have press OK as highlighted in the following image.
Up until now everything was pretty straightforward, but this is where things start to get a little more complex. Don't worry, I'll be suggesting options for you to start from, and then at the end of each section I'll try to explain them in a bit more detail.
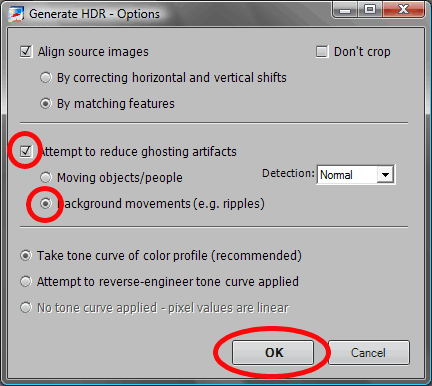
You should now see a window labelled "Generate HDR - Options". Unless you used a sturdy tripod I suggest you always leave "Align source images" ticked, and the "By matching features" option selected. The second alignment method "By correcting horizontal and vertical shifts" was the only option available in older versions of Photomatix, but it has the disadvantage that it doesn't correct for the common issue of rotating the camera. Selecting "Don't crop" keeps the entire frame even when there's blank space in the image caused by the realignment process; so in most cases you don't want to select that.
Remember to set the relevant options under "Attempt to reduce ghosting artifacts", for the sample set "Background movements (e.g. ripples)" is the best setting, as there are ripples, but no people in the image. If you're using your own images you'll need to think about which the most obvious moving objects are though, and select an option accordingly.
For the vast majority of images leave "Take tone curve of color profile (recommended)" selected. The two other "tone curve" options are only used in very special circumstances. If you try and merge images and Photomatix comes up with an error that it was unable to find a tone curve, select "Attempt to reverse-engineer tone curve applied". The final option "No tone curve applied - pixel values are linear" should only be used if your original files were RAW and you've converted your RAW files as linear TIFFs, but this is very unusual.
To recap, your settings should match the image below:
Once you've clicked OK, in a few moments you'll have created your first HDR. Congratulations!
Of course, that's only half of the story. We still need to process that HDR into something that's easily viewed on the computer screen, but we'll deal with that on the next page.
