| 1: Intro & spec | 2: First impressions | 3: Installing an HDD | 4: User interface | 5: Timings & performance | 6: Compared to | 7: Conclusion |
Nexto CF Ultra ND2525
portable storage device review
3: Installing a hard disk
If you've bought your ND2525 as a bare unit, i.e. one without a HDD fitted, the first thing you need to do is physically install your hard disk.
Installation is moderately easy; just lift off the back of the case, and slide the drive in. The finger cut-outs are well placed, and there are no sharp edges to cut yourself on. My only concern is that you have to insert the hard disk somewhat diagonally to get it inside the case, which means there's an increased risk of bending the pins on the HDD or accidentally squeezing the disk too hard.
How to install the disk
Note: Whilst many people successfully install hard disks without any form of anti-static precautions, there's always a possibility that you'll be unlucky. Always use proper anti static procedures where possible. Ideally that means you'll work on an anti-static mat, and be wearing an anti-static wrist stap - both earthed.
The first step is to remove the back of the ND2525. Mine was supplied bare, and the back of the case was not screwed together, so it simply lifted off. The easy way to check is to look at the sides, if you only have two screws and two empty holes on each side then the cover should just lift off. If not, you'll have to unscrew the back cover.
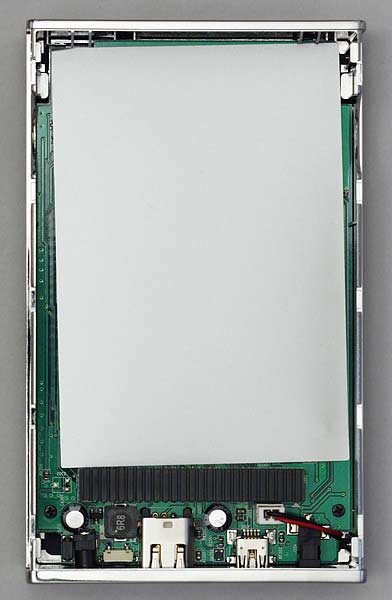
Once open, this is what we should find. Notice the large black block at the bottom? That's the PATA connector, which we'll be attaching the hard disk to.
Next step is to insert the hard disk. Remove it from its anti-static protective packaging, and handle by the sides if possible. Do not apply pressure to the top of the drive, and be careful of the pins, as they're easily bent.
Check the pins on the drive - they should all be straight. If they're not, DO NOT ATTEMPT to install the hard disk. Bent pins could permanently damage both the Nexto and the hard disk itself.
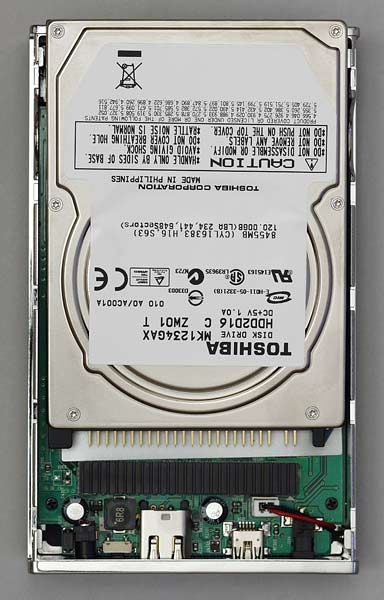
Move the hard disk into position, and check the alignment of the pins against the connector. See the area where there are no pins on the drive, and correspondingly no holes in the block? That tells you which way up the disk needs to go. In most cases, it's label upwards, obviously with the pins facing the connector.
Now gently push the hard disk towards the connector, being careful to avoid dragging the hard disk across the edge.
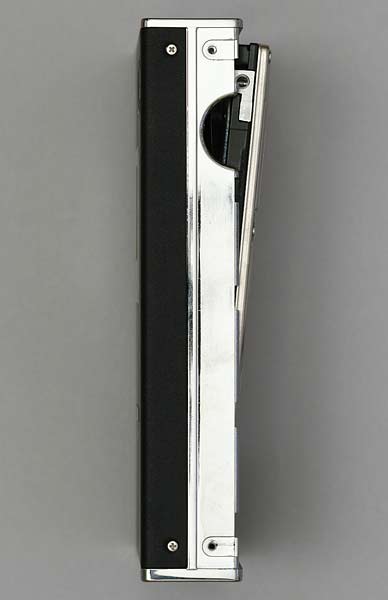
Notice the cut-outs on the side of the Nexto - these are finger holes to make it easier to slide the drive along once it's inside the shell of the Nexto:
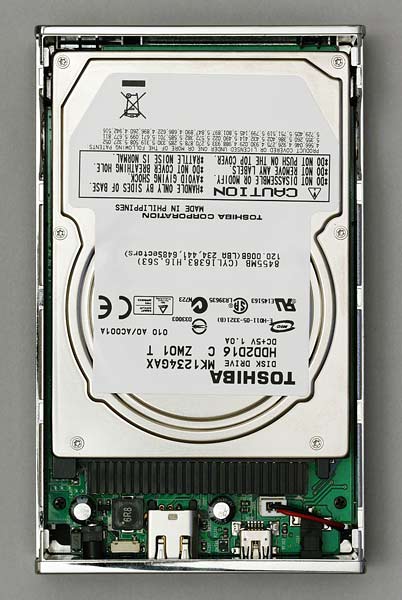
Here's how the drive should look when you're done - notice how the pins on the hard disk are completely inside the connector on the Nexto, and that the drive is now fully inside the shell:
Finally, carefully place the back cover back on the Nexto - it should go on easily. Find the four screws, which should be in a small bag inside the box somewhere, and tighten them gently but firmly until they don't rotate easily.
Once done, you're ready to format the drive - I'll show you how to do that on the next page!
3: Installing a hard disk
If you've bought your ND2525 as a bare unit, i.e. one without a HDD fitted, the first thing you need to do is physically install your hard disk.
Installation is moderately easy; just lift off the back of the case, and slide the drive in. The finger cut-outs are well placed, and there are no sharp edges to cut yourself on. My only concern is that you have to insert the hard disk somewhat diagonally to get it inside the case, which means there's an increased risk of bending the pins on the HDD or accidentally squeezing the disk too hard.
How to install the disk
Note: Whilst many people successfully install hard disks without any form of anti-static precautions, there's always a possibility that you'll be unlucky. Always use proper anti static procedures where possible. Ideally that means you'll work on an anti-static mat, and be wearing an anti-static wrist stap - both earthed.
The first step is to remove the back of the ND2525. Mine was supplied bare, and the back of the case was not screwed together, so it simply lifted off. The easy way to check is to look at the sides, if you only have two screws and two empty holes on each side then the cover should just lift off. If not, you'll have to unscrew the back cover.
Once open, this is what we should find. Notice the large black block at the bottom? That's the PATA connector, which we'll be attaching the hard disk to.

Next step is to insert the hard disk. Remove it from its anti-static protective packaging, and handle by the sides if possible. Do not apply pressure to the top of the drive, and be careful of the pins, as they're easily bent.
Check the pins on the drive - they should all be straight. If they're not, DO NOT ATTEMPT to install the hard disk. Bent pins could permanently damage both the Nexto and the hard disk itself.
Move the hard disk into position, and check the alignment of the pins against the connector. See the area where there are no pins on the drive, and correspondingly no holes in the block? That tells you which way up the disk needs to go. In most cases, it's label upwards, obviously with the pins facing the connector.
Now gently push the hard disk towards the connector, being careful to avoid dragging the hard disk across the edge.

Notice the cut-outs on the side of the Nexto - these are finger holes to make it easier to slide the drive along once it's inside the shell of the Nexto:

Here's how the drive should look when you're done - notice how the pins on the hard disk are completely inside the connector on the Nexto, and that the drive is now fully inside the shell:

Finally, carefully place the back cover back on the Nexto - it should go on easily. Find the four screws, which should be in a small bag inside the box somewhere, and tighten them gently but firmly until they don't rotate easily.
Once done, you're ready to format the drive - I'll show you how to do that on the next page!

